Application of Laser Displacement Sensors in Measuring Silicon Ingot Diameters
- Share
- publisher
- Zoe
- Issue Time
- Nov 19,2024
Summary
Laser displacement sensors are essential tools for measuring the diameter of silicon ingots, offering high precision, real-time capabilities, and non-contact measurement advantages. By optimizing sensor layout, data processing, and environmental conditions, these sensors can significantly enhance measurement efficiency and product quality, providing strong support for subsequent silicon ingot processing.

Importance of Measuring the Diameter of Silicon Ingots
The diameter of silicon ingots is a critical quality parameter in the semiconductor and photovoltaic industries, impacting various production and processing stages:
Quality Control
Ensures that the silicon ingot's diameter meets design specifications, preventing processing difficulties or performance degradation caused by uneven diameters. For example, deviations exceeding ±0.02mm can significantly impact wafer cutting precision.
Wafer Cutting
Provides accurate dimensional references for wafer cutting, ensuring consistency in the thickness and size of the cut wafers, thus improving product uniformity and yield.
Equipment Compatibility
Guarantees that the silicon ingot's diameter matches the requirements of subsequent processing equipment, reducing equipment setup time and improving production efficiency.
Performance Optimization
The diameter of the silicon ingot directly influences key properties like mechanical strength and thermal conductivity, significantly impacting the final product's quality.
Common Methods for Measuring the Diameter of Silicon Ingots
Laser Displacement Sensors
Principle: Use non-contact measurement to calculate the diameter by detecting the changes in the position of the laser beam reflected on the ingot's surface.
Features: High precision (up to ±2μm), fast measurement, suitable for online measurement with real-time monitoring capabilities.
Applications: Ideal for high-speed rotation or high-precision online detection scenarios.
Optical Measurement Systems
Principle: Measure the diameter of the silicon ingot using image processing technology, such as capturing surface images with a CCD camera and calculating dimensions.
Features: Suitable for offline inspection, with higher accuracy but sensitive to surface cleanliness and stable lighting conditions.
Applications: Used in scenarios requiring extremely high measurement precision or simultaneous recording of surface features.
Mechanical Calipers
Principle: Directly measure the diameter of the silicon ingot through contact.
Features: Simple and portable but with relatively low precision (around ±0.1mm). Relies on manual operation and is unsuitable for industrial applications requiring high accuracy.
Applications: Quick field measurements or low-precision preliminary checks.
Application of Laser Displacement Sensors in Measuring Silicon Ingot Diameters
Due to their high precision and non-contact measurement capabilities, laser displacement sensors have become a core technology for measuring silicon ingot diameters. Below are the typical solutions:
Sensor Layout Design
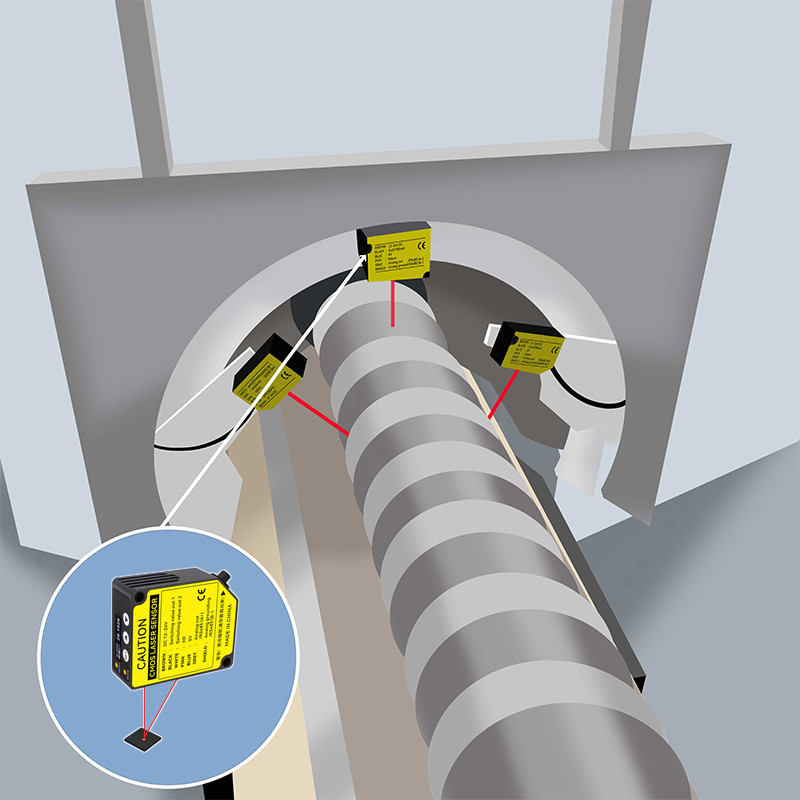
Surrounding Multi-Point Measurement: Multiple laser displacement sensors are arranged around the silicon ingot to simultaneously capture diameter data at multiple points, enabling the calculation of the average diameter and roundness.
Online Real-Time Detection: Sensors are installed above the production line, utilizing their high-speed measurement capabilities to achieve uninterrupted detection during ingot rotation.
Data Collection and Processing
Smart Algorithm Compensation: Algorithms are employed to correct environmental interferences (e.g., variations in surface reflectivity or ambient light), ensuring data accuracy.
Real-Time Monitoring and Alarms: Software systems monitor measurement data in real-time. If the diameter deviation exceeds a preset range (e.g., ±0.02mm), alarms are triggered or process parameters are automatically adjusted.

High-Precision Distance Measurement
GFL-G30N(P)M, (Analog output and switching output, precision: 0.002mm)
GFL-G30N(P)-485, (RS-485 communication and switching output, precision: 0.002mm)
GFL-G50N(P)M, (Analog output and switching output, precision: 0.005mm)
GFL-G50N(P)-485, (RS-485 communication and switching output, precision: 0.005mm)
GFL-G85N(P)M, (Analog output and switching output, precision: 0.01mm)
GFL-G85N(P)-485, (RS-485 communication and switching output, precision: 0.01mm)
GFL-G120N(P)M, (Analog output and switching output, precision: 0.03mm)
GFL-G120N(P)-485, (RS-485 communication and switching output, precision: 0.03mm)
GFL-G250N(P)M, (Analog output and switching output, precision: 0.075mm)
GFL-G250N(P)-485, (RS-485 communication and switching output, precision: 0.075mm)
